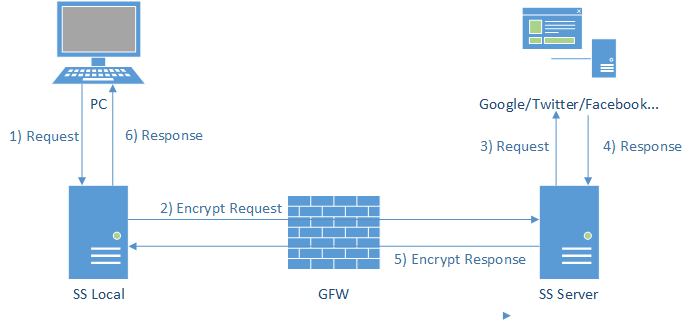
Shadowsocks

安装
ssserver & sslocal
服务器端
1
2
3
4
5
6
7
8
9
10
11
| vim /etc/ss.json
{
"server": "host",
"server_port": 4443,
"local_port": 1080,
"password": "password",
"timeout": 600,
"method": "aes-256-cfb"
}
ssserver -d start -c /etc/ss.json
|
客户端
1
2
3
4
5
6
| sslocal -d start -c /etc/ss.json
-p port
-s server
-k pass
-m encryption
-h help
|
部署脚本
1
2
3
4
5
6
7
8
9
10
11
12
13
14
15
16
17
18
19
20
21
22
23
24
25
26
27
28
29
30
31
32
33
34
35
36
37
38
39
| #!/bin/sh
# install pip
curl -s "https://bootstrap.pypa.io/get-pip.py" | python
# isntall shadowsocks
pip install shadowsocks
# 获取IP
ip=`curl -s https://api.ipify.org`;
# 服务端口
port=4433
# 密码
pass="password"
# 配置文件
# 如果无法启动尝试绑定服务器IP为0.0.0.0
rm -rf /etc/ss.json
touch /etc/ss.json
echo -e "{ \n \
\"server\": \"$ip\", \n \
\"server_port\": $port, \n \
\"local_port\": 1080, \n \
\"password\": \"$pass\", \n \
\"timeout\": 600, \n \
\"method\": \"aes-256-cfb\" \n \
}" > /etc/ss.json
# 防火墙
iptables -I INPUT 1 -p tcp --dport 4433 -j ACCEPT
iptables -I OUTPUT 1 -p tcp --sport 4433 -j ACCEPT
iptable -I INPUT 5 -p icmp -j ACCEPT
service iptables save
service iptables reload
# 启动服务
ssserver -d start -c /etc/ss.json
|
参考
https://github.com/shadowsocks/shadowsocks/wiki
https://shadowsocks.org/
https://github.com/shadowsocks
https://github.com/shadowsocksr-backup
